Italian Breaded Chicken Cutlets
These Italian breaded chicken cutlets are pan-fried until golden and crispy, using seasoned breadcrumbs and grated cheese for big flavor. Easy, reliable, and always a hit. Just don’t expect any leftovers!
If you told me I can only eat one meal for the rest of my life, it would be fried chicken cutlets. I wouldn’t even have to think about it because as far as I’m concerned they’re the perfect comfort food.
I first learned how to cook chicken cutlets from my mom, and we made them all the time because the whole family loved them. Now that I’m a dad with my own family, they’re a family favorite in our house too. They’re crispy, crunchy, and full of flavor…what’s not to love?
EVERYONE comes running home when they hear I’m making chicken cutlets for dinner!

What Is A Chicken Cutlet?
A chicken cutlet is simply a piece of boneless skinless chicken breast that’s been sliced thin or pounded so it cooks quickly and evenly. They can be breaded and fried or used in other popular dishes such as Chicken Francese, Chicken Parmesan, Chicken Marsala, or Chicken Milanese.
Ingredients
The full list of ingredients and measurements are in the recipe card below, but I wanted to share some additional notes here.
- Breadcrumbs – My mom only used finely ground Italian seasoned breadcrumbs in her cutlets. But I like to mix those with plain Panko breadcrumbs to get the perfectly crispy and crunchy bite. I really like mixing the larger Panko with some fine breadcrumbs because I find it gives you perfect breading coverage as the fine crumbs fill in any gaps between the Panko. Homemade breadcrumbs are another great option.
- Chicken – I’ll take boneless skinless chicken breast for $1,000, Alex. You can buy thin-sliced chicken cutlets at the supermarket, but you’ll pay extra for the convenience. I prefer to save a few bucks by buying thicker breasts and then doing the slicing and pounding myself. Pounding chicken breasts thin tenderizes the meat and ensures they cook uniformly.
- Grated Cheese – Adding some grated Pecorino Romano or Parmigiano Reggiano cheese is a game-changer!
- Oil – Chicken cutlets are usually fried in canola or vegetable oil. They’re both neutral flavored oils that are fairly inexpensive. You can add a drizzle of extra virgin olive oil or a couple tablespoons of butter to kick the flavor up a few notches.
Recommended Gear
- Fillet Knife – You’ll need a really sharp knife to slice the chicken breast thinly without hacking it up. A standard chef’s knife will get the job done, but I find a good fillet knife makes all the difference in the world.
- Meat Mallet – Once you’ve cut the chicken breast into thin slices, you’ll want to pound them with a meat mallet so they are uniform thickness. If you don’t have one, you can always use a rolling pin or the bottom of a frying pan instead.
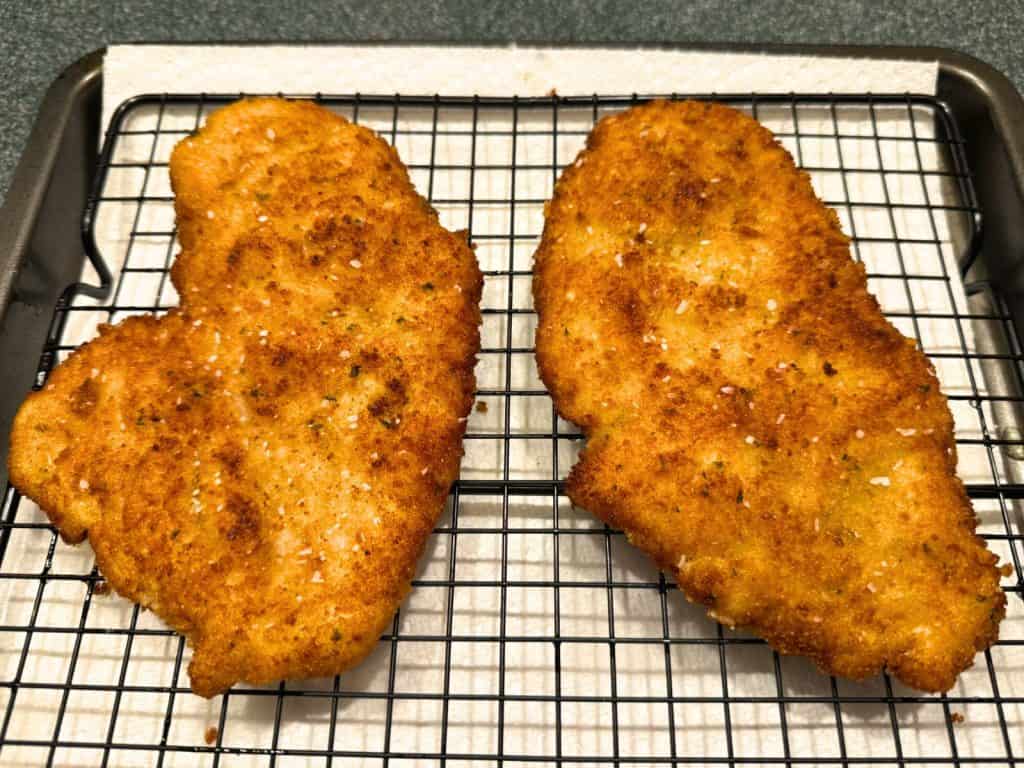
- Wire Cooling Racks – These are a must have for crispy breaded chicken cutlets. I used to place my cutlets on a baking sheet lined with paper towels to cool, but my buddy Curtis suggested putting a wire cooling rack over the paper towels. This allows excess oil to drip off the chicken and onto the paper towels, rather than sitting in a pool under the chicken cutlets. This simple trick will you give you much crispier cutlets!
Fun Fact
In Australia and the UK, this dish is often called crumbed chicken. Elsewhere in Europe it’s known as Chicken Schnitzel or Cotoletta di Pollo. You can even find a version in Asian restaurants where they’re called Chicken Katsu. Breaded chicken cutlets truly are loved worldwide!!
How To Make Chicken Cutlets Step By Step
Prep the chicken cutlets
Remove the chicken from its packaging and trim away any excess fat. There’s no need to wash the chicken.
Lay a chicken breast flat on a cutting board and place the palm of your hand on top to hold it steady. Starting at the thickest end, use a sharp fillet knife to slice the chicken in half lengthwise. Don’t worry if they aren’t totally even, we’ll take care of that in the next step.
Take a slice of chicken and place it in a freezer bag, then use a meat mallet to gently pound the chicken until the entire piece is about 1/4 to 1/2 inch thick. If some of the slices are already thin enough and even enough you can skip this step.
WANT TO SAVE THIS RECIPE?
Note – if you’re only making a small portion you can skip the freezer bag and just lay a piece of plastic wrap over the chicken before pounding it. When i cook chicken cutlets I’m usually making somewhere between four and six pounds, and I quickly get frustrated with plastic wrap. In my experience a freezer bag works much better.
Set up your breading station
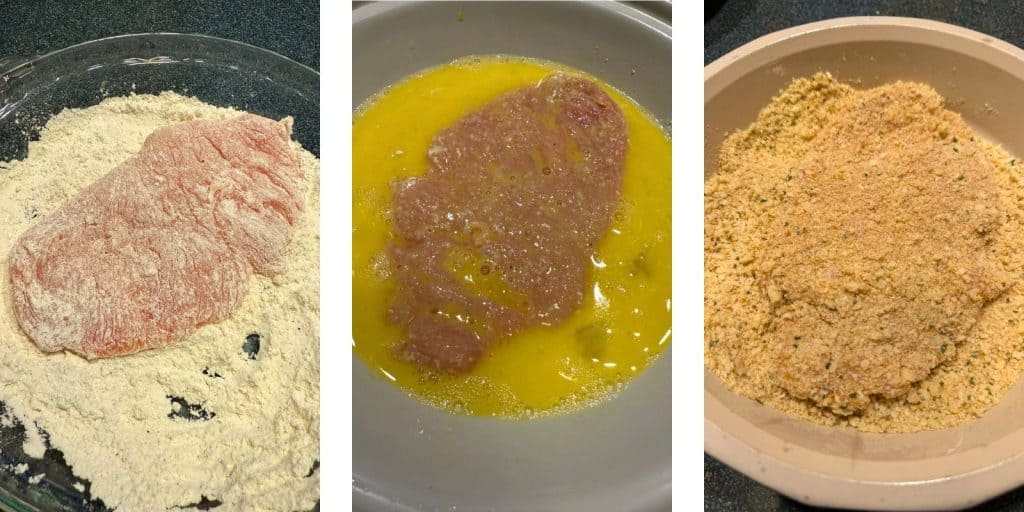
You’ll need three shallow bowls to get started.
- In the first bowl, add the flour and season with salt and pepper.
- In the second bowl, whisk together the eggs with a tablespoon of water and then season that with salt and pepper too.
- In the third bowl mix together the breadcrumbs, garlic powder, and pinch of salt and pepper.
Bread the chicken
- Take a slice of chicken and dredge it in the flour until coated on all sides. Gently shake the chicken to remove any excess flour.
- Dip the chicken into the egg mixture and let the excess drip off
- Next place the cutlet in the breadcrumbs. Make sure the chicken is completely coated with breadcrumb, and don’t be afraid to get your hand in there to press it down.
- Transfer the chicken to a clean plate or baking sheet while you bread the rest of the chicken.
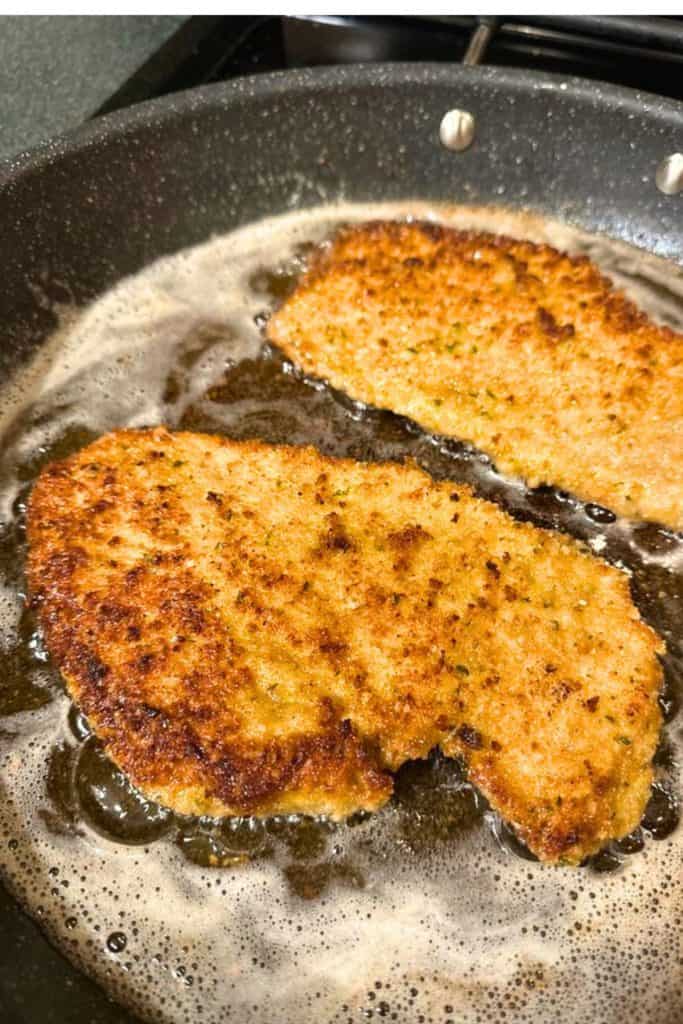
Fry the chicken cutlets
- Line a baking sheet with paper towels and a wire cooling rack. this is where you’ll place the cutlets when they’ve finished cooking.
- Heat the oil in a heavy bottom pan. Aim for a temperature of about 350 F. You’ll know its ready when the oil starts to shimmer. I like to bread a few bite-sized pieces of chicken and I toss those in first. If they immediately start to sizzle I know the oil is the right temperature. Those small pieces also make a perfect snack while cooking. If anyone asks, its just “quality control” hahaha!
- Gently place the chicken into the oil so you don’t get splattered with hot oil. Cook the cutlets in batches and make sure you don’t overcrowd the pan.
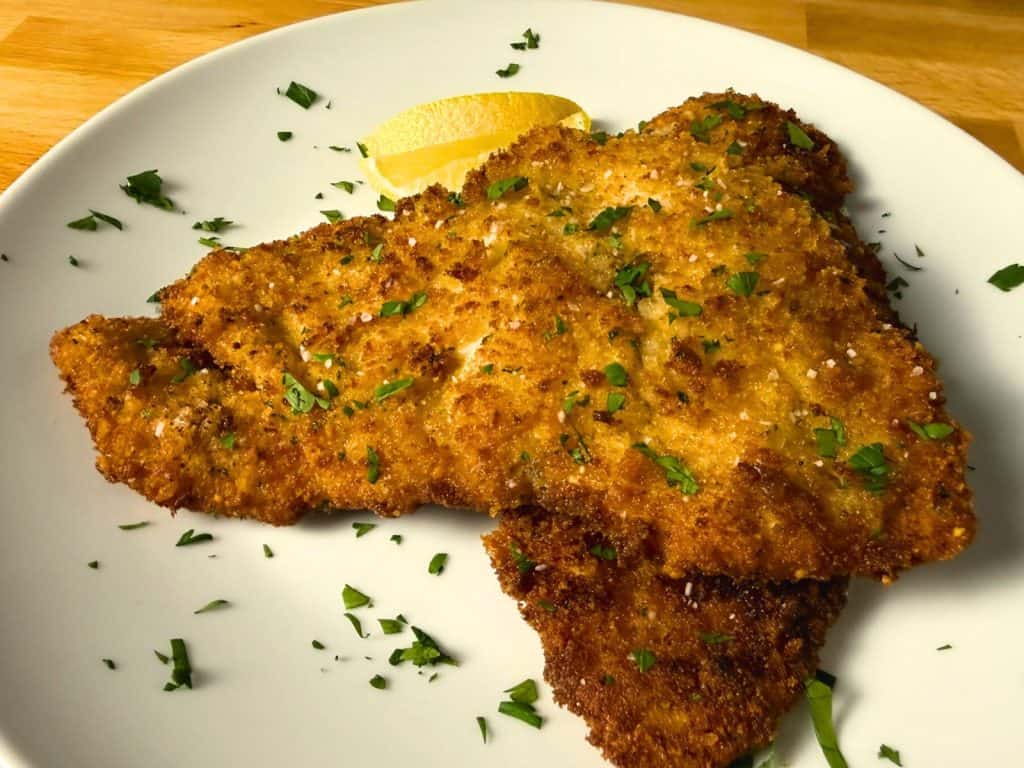
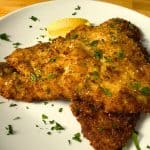
- Cook until golden brown on each side, about two to three minutes per side. Then transfer to the wire rack and sprinkle with Kosher salt. Garnish with fresh parsley and serve warm.
Tips For The Best Chicken Cutlets
Over the years, I’ve cooked ridiculous amounts of breaded chicken cutlets (we probably eat them two to three times per month on average in our house). That means I’ve had a lot of practice and I’ve gotten this meal down to an exact science. Here’s some tips I’ve learned through trial and error:
- My mom only used finely ground Italian seasoned breadcrumbs. But I like to mix those with plain Panko breadcrumbs to get that perfectly crispy and crunchy bite.
- Pounding chicken breasts thin tenderizes the meat and ensures they cook uniformly.
- Mixing grated Pecorino or Parmesan cheese into the breadcrumbs makes the cutlets more crispy and adds depth of flavor.
- Adding a little butter to the oil while frying is a simple trick to take you chicken cutlets to the next level.
- If you’re cooking a large batch of breaded chicken cutlets, use two pans or be prepared to change the oil. If you try to cook too many with the same oil the later batches will get too dark and you won’t get that golden brown beauty.
- Oil temperature is key. If the temp is too low you’ll get soggy cutlets, and if its too hot they’ll burn.
- If you have a flat top griddle outside you can avoid a messy kitchen by making chicken cutlets on a Blackstone.
What To Serve With Italian Breaded Chicken Cutlets
Chicken cutlets are one of the most versatile dishes ever and they go well with almost anything. But since you asked, here’s a few of my favorite options:
- Cheesy Minute Rice – hands down my family’s favorite!
- Creamy garlic mashed potatoes
- Rice pilaf
- Pasta with marinara sauce
- Fettucine Alfredo
- Creamy lemon spaghetti
Of course you can also add some breaded chicken cutlets to a salad, make a chicken cutlet sandwich, or use it as a pizza topping.
PrintItalian Breaded Chicken Cutlets
These Italian breaded chicken cutlets are pan-fried until golden and crispy, using seasoned breadcrumbs and grated cheese for big flavor. Easy, reliable, and always a hit. Just don’t expect any leftovers!
- Prep Time: 20
- Cook Time: 15
- Total Time: 35 minutes
Ingredients
- 2 pounds boneless skinless chicken breasts thinly sliced
- 1 cup all purpose flour
- 3 large eggs
- 2 cups plain panko breadcrumb
- 1 cup Italian breadcrumbs
- 1 teaspoon garlic powder
- 1 tablespoon parsley chopped
- 2 cup grated Pecorino Romano cheese
- Kosher salt to taste
- freshly ground black pepper to taste
- 2 pounds boneless skinless chicken breasts thinly sliced
- 2 tablespoons butter
- Oil for frying use a mix of vegetable oil and extra virgin olive oil
Instructions
Prep the chicken
- Lay a chicken breast flat on a cutting board and place the palm of your hand on top to hold it steady. Starting at the thickest end, use a sharp fillet knife to slice the chicken in half lengthwise. Don’t worry if they aren’t totally even, we’ll take care of that in the next step.
- Take a slice of chicken and place it in a freezer bag, then use a meat mallet to gently pound the chicken until the entire piece is about 1/4 to 1/2 inch thick. If some of the slices are already thin enough and even enough you can skip this step.
Prep the breading station
- Set up three shallow bowls
- In the first bowl, add the flour and season with salt and pepper.
- In the second bowl, whisk together the eggs with a tablespoon of water and then season that with salt and pepper too.
- In the third bowl mix together the breadcrumbs, garlic powder, and pinch of salt and pepper.
Bread the chicken
- Take a slice of chicken and dredge it in the flour until coated on all sides. Gently shake the chicken to remove any excess flour.
- Dip the chicken into the egg mixture and let the excess drip off
- Next place the cutlet in the breadcrumbs. Make sure the chicken is completely coated with breadcrumb, and don’t be afraid to get your hand in there to press it down.
- Transfer the chicken to a clean plate or baking sheet while you bread the rest of the chicken.
Fry the chicken cutlets
- Line a baking sheet with paper towels and a wire cooling rack. this is where you’ll place the cutlets when they’ve finished cooking.
- Heat the oil in a heavy bottom pan. Aim for a temperature of about 350 F. You’ll know its ready when the oil starts to shimmer. I like to bread a few bite-sized pieces of chicken and I toss those in first. If they immediately start to sizzle I know the oil is the right temperature. Those small pieces also make a perfect snack while cooking. If anyone asks, its just “quality control” hahaha!
- Gently place the chicken into the oil so you don’t get splattered with hot oil. Cook the cutlets in batches and make sure you don’t overcrowd the pan.
- Cook until golden brown on each side, about two to three minutes per side. Then transfer to the wire rack and sprinkle with Kosher salt. Garnish with fresh parsley and serve warm.
Notes
- Pounding chicken breasts thin tenderizes the meat and ensures they cook uniformly.
- If you’re cooking a large batch of breaded chicken cutlets, use two pans or be prepared to change the oil. If you try to cook too many with the same oil the later batches will get too dark and you won’t get that golden brown beauty.
- Oil temperature is key. If the temp is too low you’ll get soggy cutlets, and if its too hot they’ll burn.